Studio 6A
Names
Open questions.md and list the names of everyone in your group.
Assembly Math
Using task 2.1, complete code in math.s in the designated areas that will compute 3*a + b - c using only the instructions from Table B.1 (compute use addition rather than multiplication).
As you’re working:
-
Use the “2.2 Run math.s” task to run the task.
This program includes environment calls (ecalls), which can be used for input and output. The example will print the values of a, b, and c before and after your work. The results are shown in theVenus Terminaltab: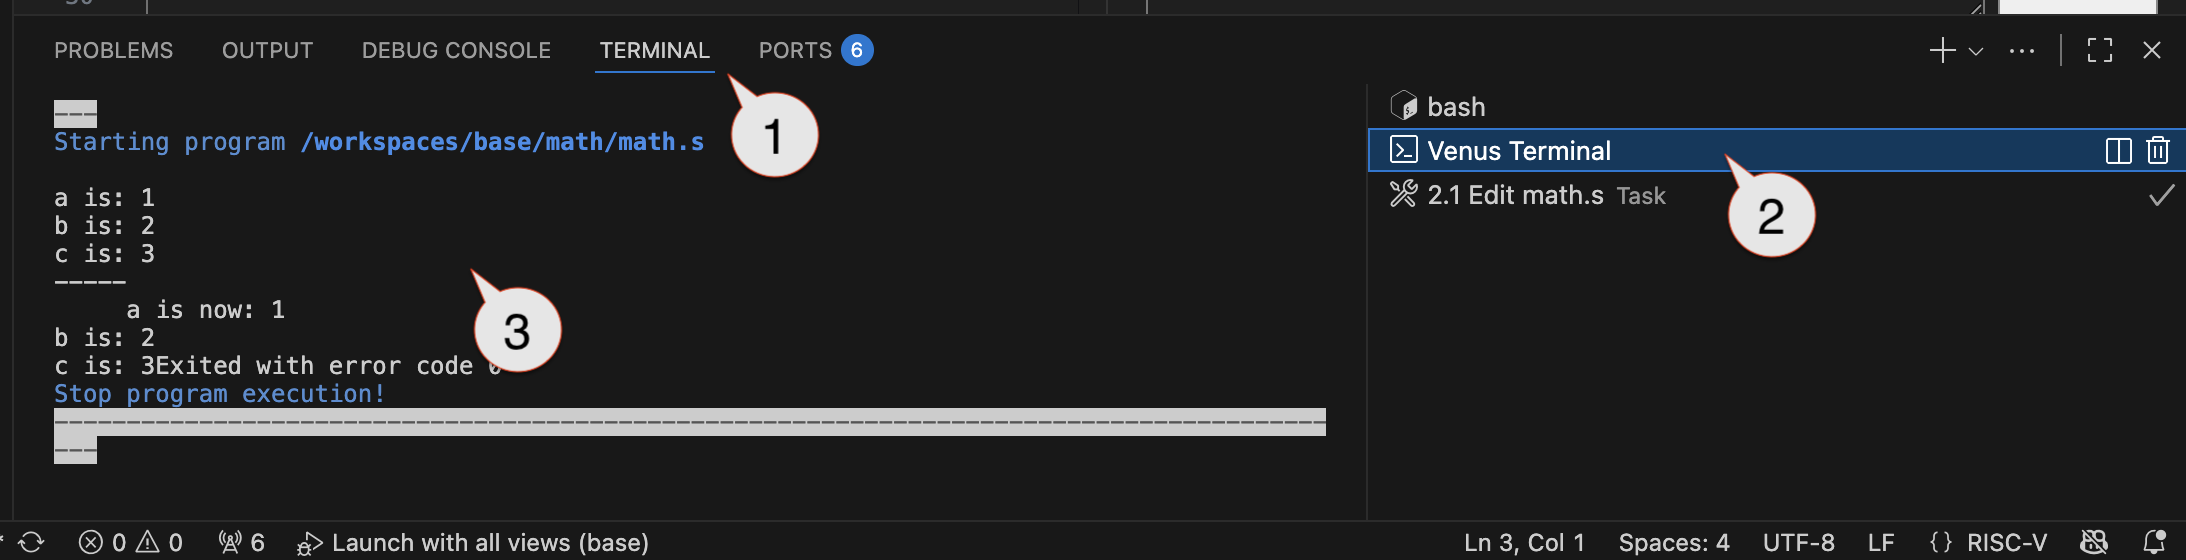
Once your code is error free, it should start up the simulator (shown below)
-
A tab should appear with our I/O board and UPduino. In addition, floating panel should appear with buttons to run the code, step through line-by-line, and reload to the start. Step through the program a few times. Practice using this and the registers view to observe how the program modifies the registers as it runs.

- Use the debug panel to step through and observe register values changing (i.e., prepare for debugging)
- Click on the
Run and Debugbutton, which will open the control panel for Venus (the RISC-V simulator) - Expand the “Integer” section to show the current values in each of the regular, integer registers.
- Use either
Step OverorStep Intoto execute lines one-at-a-time. Review the register contents and confirm they change as you’d expect.
Step Over vs. Step Into
Step OverandStep Intobehave the same on simple lines of code. They differ when functions are called (thejalinstruction).-
Step Overwill execute the function in it’s entirety and allow you to keep debugging at your current scope. -
Step Intowill continue executing one line at a time and go “into” the function.
- Click on the
-
Stop the program, deliberately make a typo (syntax error / invalid line or instructions) and try to run it again. Where is the error message displayed? (Answer in
questions.md) - Change the values of
a,b, andca few times and confirm your approach works correctly. Also test making changes and using the reload button to re-run your code.
Stop the simulator
Be sure to use the “Stop” button to stop the simulator before moving on to a new file. Close the tab for math.s.
More Assembly Math
Open and complete moremath.s, which asks you to approximate the computation of 110% of an integer without using multiplication or division. Come up with an approach using ~2-8 instructions and re-run your program with a few different test cases.
Challenge: Think about ways to make it more accurate and to identify the amount of error.
Assembly Loops
Complete the loop problem described in loops.s. You can use the formula $ \frac{n \cdot (n+1)}{2} $ to check your work. Test your work with different values.
Hint: You will need want to use labels in conjunction with “conditional branching” instructions, like beq or bne. A typical structure may look like:
start_of_loop:                  # The "label" used to provide a name to go back to the start of the loop
   beq s0, s1, end_of_loop      # If the "end condition" is met (in this case s0==s1), go to the lines after the loop

   # Body of the loop and updating loop variables
   ...
   j start_of_loop              # Go back to the top of the loop
end_of_loop:
   # Stuff after the loop
Hello I/O: Calling All Ecalls
Environment calls (ecall) were used in the prior parts to do basic output. There are already ecalls that support the I/O board we’ve been using, both in simulation and with a real RISC-V core running on the UPduino. Ecalls work by:
- Put the “call code” in register
a0(this is a number that indicates what operation should be performed) - If necessary, put additional required information in other registers (typically just
a1). For example, if the call will print an integer, the integer’s value would be put ina1. - Use the
ecallinstruction, which will transfer control to the environment (it’s kind of a primitive operating system).
The description of the ecalls for the I/O board can be found here.
The diagram summarizes many of the important features and what bits mean:
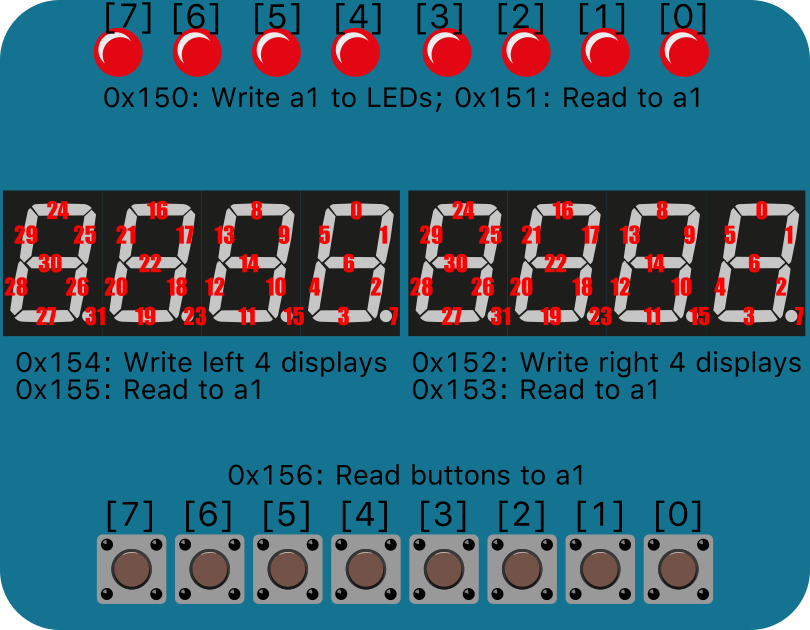
The 0x... describe the “call codes” used with the ecall. Other required information is passed in a1. The segments on the 7-segment displays in the diagram are numbered. This indicates the bit (place-value notation style) used to control that segment. It may be best to do some simple experiments to get a sense of how it behaves. For example, do an ecall to write to the right four displays the value 0x1 and observe what happens. Then try 0x2. Then 0x3, and 0x4. Make sure you understand how the values are controlling the displays.
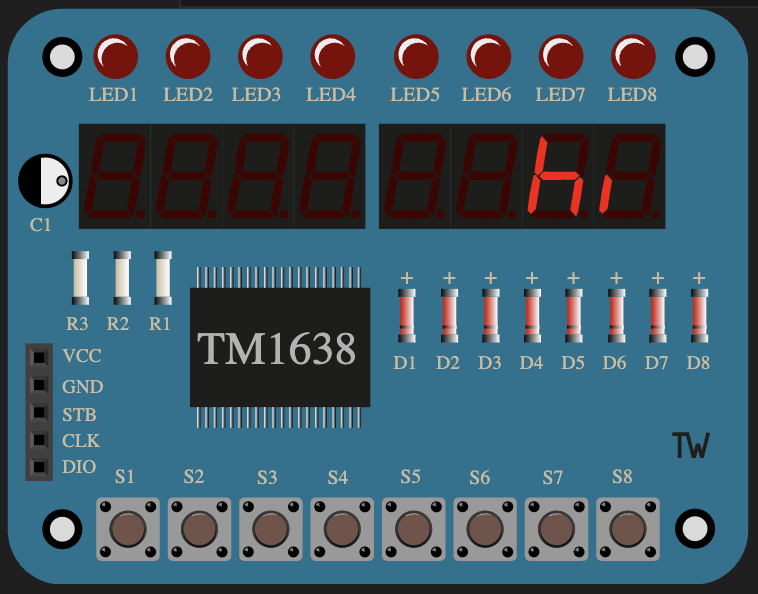
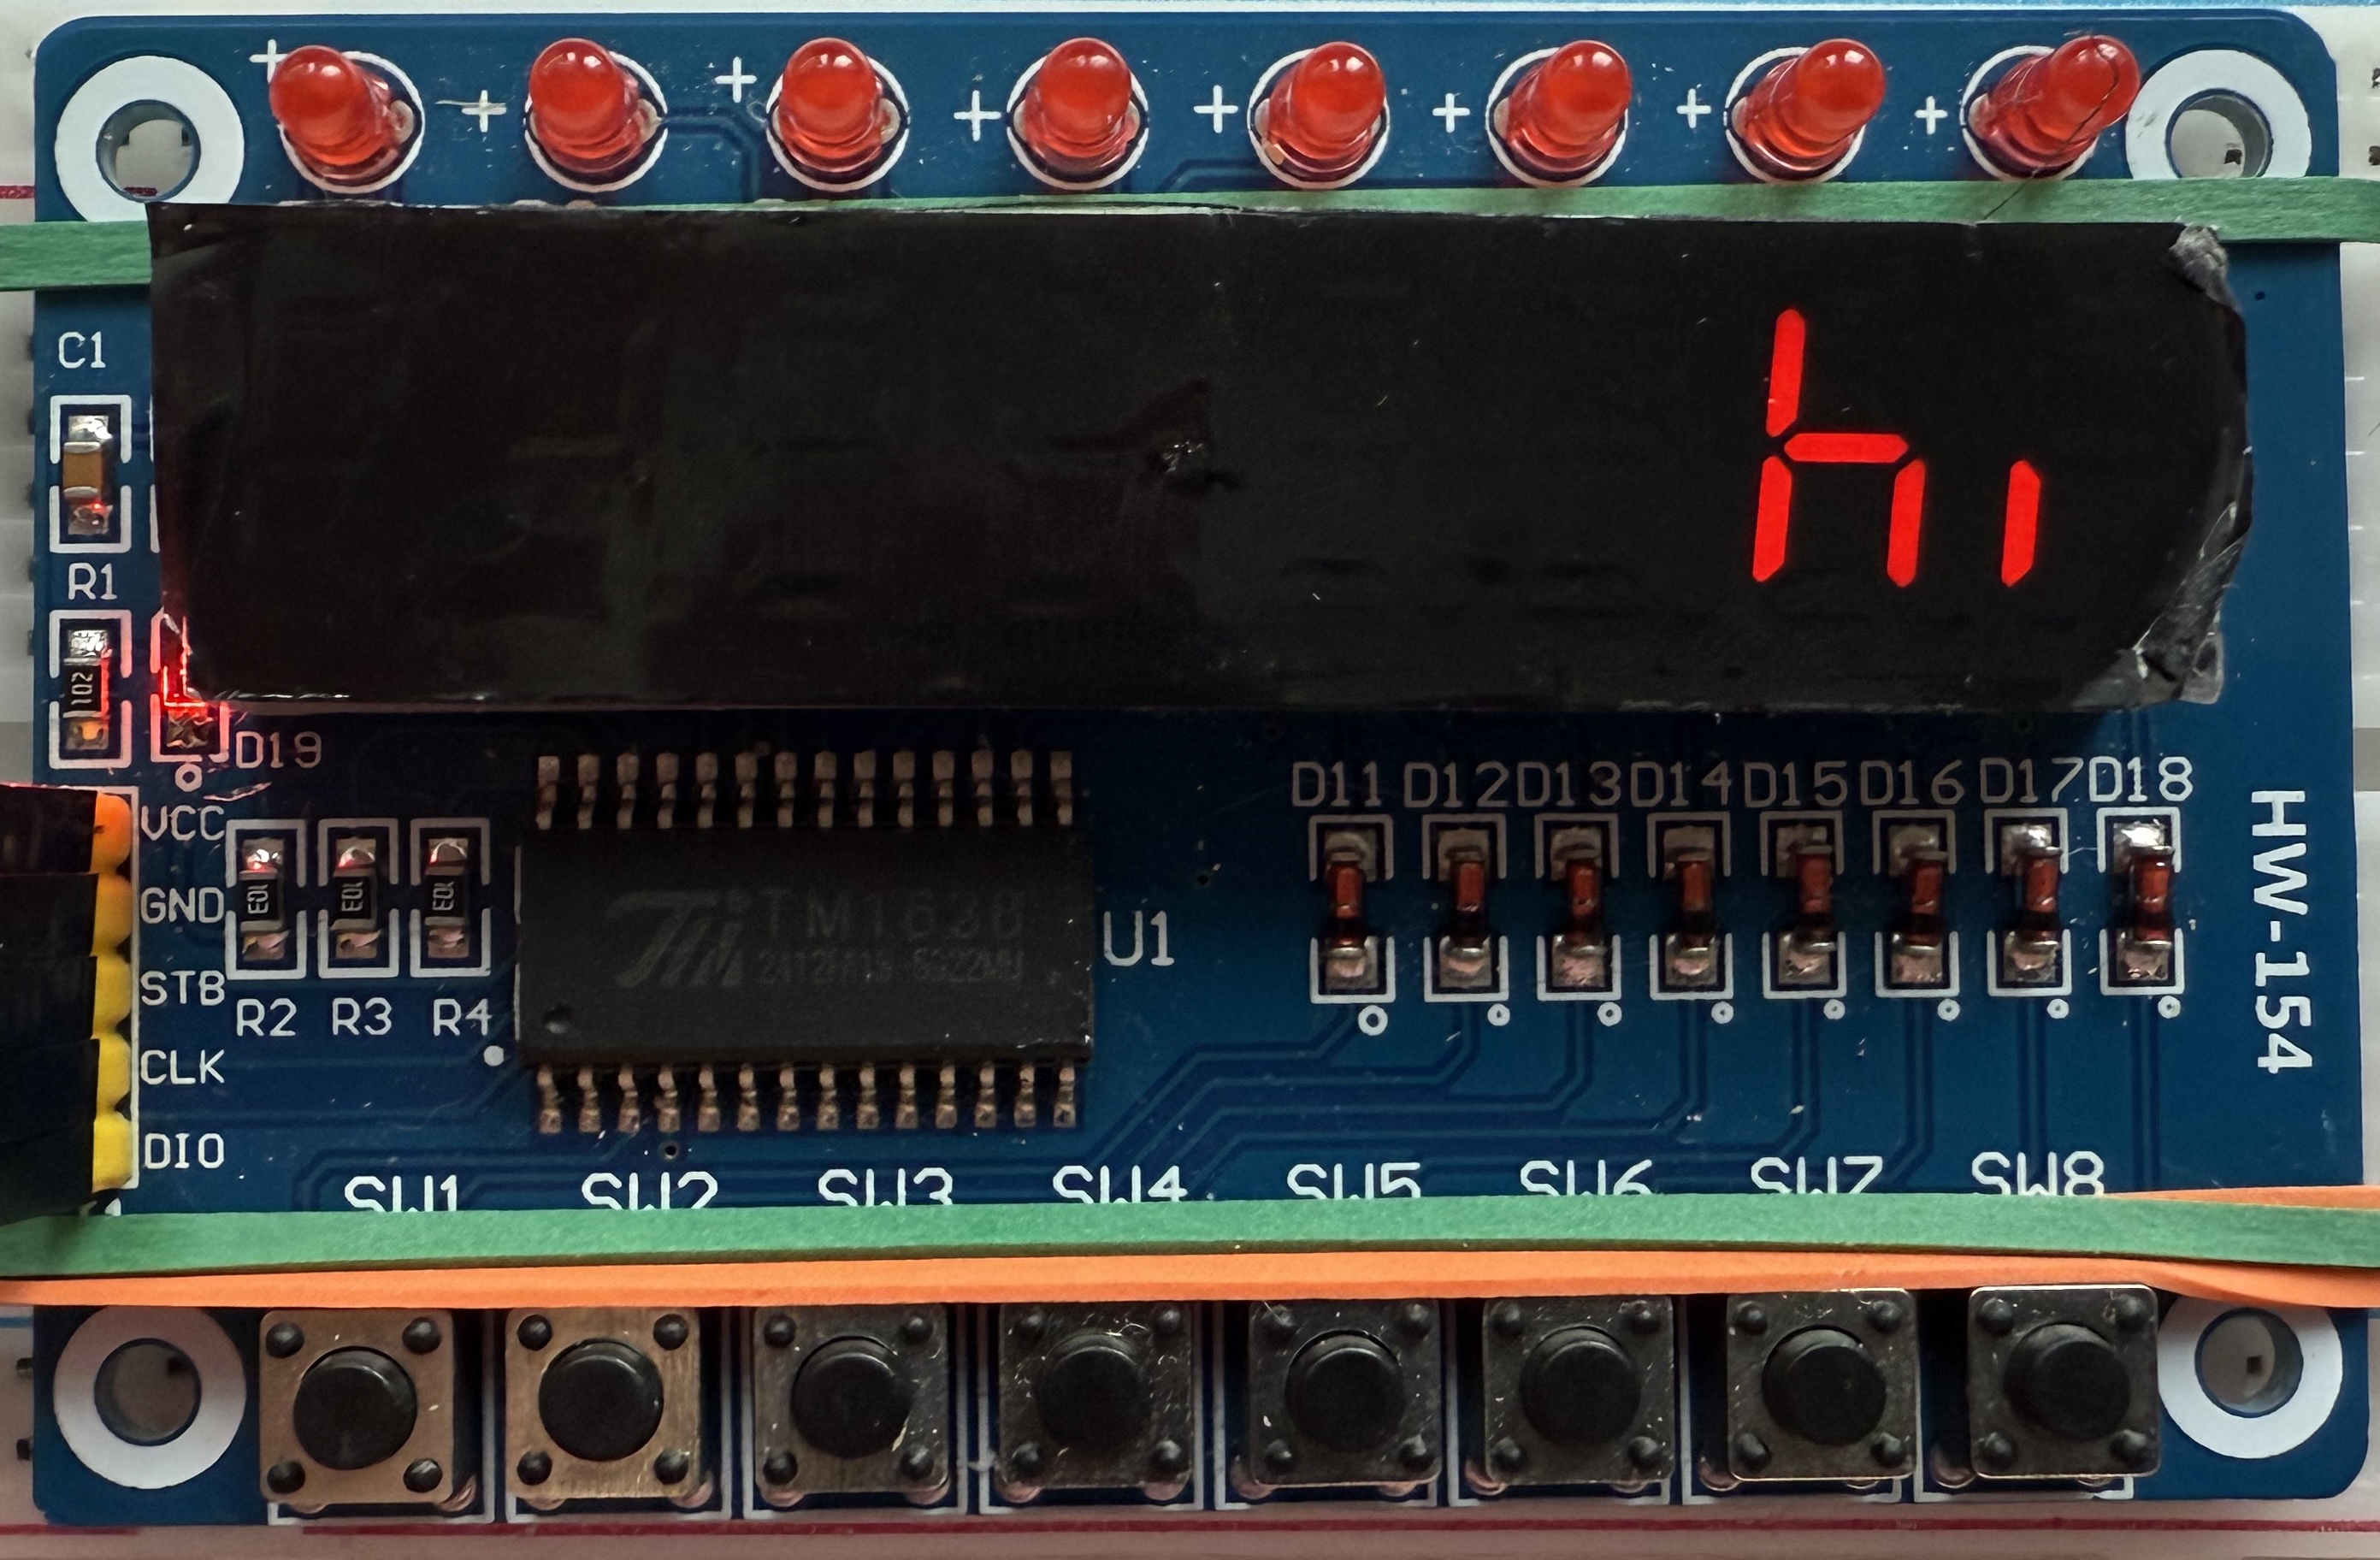
Use task 5.1 and 5.2 to show “hi” on the (simulated) display:
REAL I/O
The CPU Core
The FPGA can be configured to simulate a nearly complete RISC-V processor. Run the FPGA Image Server task and upload the pico-rv32imc-2600.bin image. This image:
- Is PicoRV32 implementation.
- “Pico” because it was designed to fit on small FPGA devices.
- RV indicates “RISC-V”
- 32 because it’s a 32-bit processor
- The “imc” in the file name indicates the extra features that were included in this version:
- “i” for the basic 32-bit instructions,
- “m” for inclusion of integer multiplication and division instructions, and
- “c” for support of compressed instructions (16-bit instructions).
- The “2600” include support specific to CSE 2600, like support for our I/O board.
When the FPGA is first started (after this is programmed) it will run through an initialization sequence, which will be shown on the 7-segment LEDs.
The Firmware (code) for the CPU to run
You can use task 5.3 Rebuild helloio.S SOC Firmware to convert your helloio.S code. It will create a helloio_fw.bin file which you can now program onto the FPGA too. If it works correctly, your code should now run on the RISC-V on the FPGA:
Caution!
This example “programs” the FPGA in a different way than other examples have. It divides the FPGA memory into two parts:
- The
pico-rv32imc-2600.bingoes into the lower part of memory. It is used to configure the programmable hardware and, essentially, turns the UPduino into a 32-bit RISC-V processor. - The
helloio_fw.binis programmed into the upper part of memory. It is the program code that will be run on the RISC-V processor.
You must have both, but you can reprogram them independently. For example, after the pico-rv32imc-2600.bin is loaded, you can repeatedly change the code for helloio.s and re-build it (task 5.3) and reload it without having to reload pico-rv32imc-2600.bin.
Registering Challenges
The entirety of large programs running on a RISC-V processor have to share the 31 registers for almost all operations. Compilers translate programs into a form that does all work by use and re-use of just these 31 variables! This is actually quite challenging and the type of thing that is error prone in humans. In fact, most modern programming languages and style guides discourage reusing variables for different meaning/data over time!
The “register conventions” (rules of use) are:
| Register | ABI Name | Description | Saver |
|---|---|---|---|
| x0 | zero | Hard-wired zero | — |
| x1 | ra | Return address | Caller |
| x2 | sp | Stack pointer | Callee |
| x3 | gp | Global pointer | — |
| x4 | tp | Thread pointer | — |
| x5–7 | t0–2 | Temporaries | Caller |
| x8 | s0/fp | Saved register/frame pointer | Callee |
| x9 | s1 | Saved register | Callee |
| x10–11 | a0–1 | Function arguments/return values | Caller |
| x12–17 | a2–7 | Function arguments | Caller |
| x18–27 | s2–11 | Saved registers | Callee |
| x28–31 | t3–6 | Temporaries | Caller |
From the perspective of someone writing a function (you):
- If you use any registers where the Saver is Callee, you must ensure they are their original value before you return.
- You can freely use anything where the Saver is Caller.
From the perspective of someone writing code that is calling a function (might apply to you too):
- If you use any registers where the Saver is Caller, you must assume that any information in them could be destroyed by a
jalto any function. If you need the contents, you should move it someplace else. - You can freely use the items where the Saver is Callee if you are the topmost function, which is rare. In most cases the code you’re writing is both called and will call something else, so you have to follow both sets of policies.
Turn the code you wrote for the prior part (part 4’s sum computation in loops.s) into a valid RISC-V function that follows the register conventions in the TODO location of functionfun.s. Your function will be called near the top of the file:
   # Call the function
            jal checkpoint_regs   # This function helps check that you are using registers correctly
    li a0, 100
    jal sum
            jal check_regs        # This function helps check that you are using registers correctly
The jal sum calls your code. This code includes two additional function calls, jal checkpoint_regs and jal check_regs, to help ensure you are following the register use rules. They are indented extra to highlight they are extra, artificial pieces of code and not part of the program’s intended function.
- Complete the
sumfunction and confirm that it works on a few test cases. Be sure to follow the register conventions! - Add an instruction that breaks the register conventions for an s-register. Re-run your program and note the error message printed by
jal check_regs - Change a value in an s-register and then change it back to the original value. For example, move the original value someplace you can use, change the register, then move the original value back before the function returns. What happens?
- Add in more instructions that change other s-registers and check the error(s).
- The stack pointer register,
spis also “Callee Preserved”. What happens when you change its value? - The “stack” is the normal place to accomplish “move the original value someplace you can use” and is vital to the sharing process. The normal approach to using the stack is something like:
functionstart: addi sp, sp, -20 # Set aside space in a multiple of 4. This would be space for 5 words (4*5=20) # "Save" any of the callee-saved registers we need to use in consecutive places on the stack # starting with 0, increasing by 4s, and not exceeding the value set aside-3 sw s0, 0(sp) # my_stack[0] = s0 (indices are word indices. Each word is 4 bytes) sw s1, 4(sp) # my_stack[1] = s1 (so "word index[1]" is 4 bytes into the stack) sw s2, 8(sp) sw s3, 12(sp) sw s4, 16(sp) # Function body ... # Restore everything: Get back all the saved values first lw s0, 0(sp) # s0 = my_stack[0] (indices are word indices. Each word is 4 bytes) lw s1, 4(sp) # s1 = my_stack[1] (so "word index[1]" is 4 bytes into the stack) lw s2, 8(sp) lw s3, 12(sp) lw s4, 16(sp) addi sp,sp, 20 # Restore the stack's original value too (by undoing the initial subtract) jr ra # Return - Apply this approach to “storing / restoring” values and update your function to use s-registers for its computation. (You can used a condensed form since you probably don’t need 5 registers)
- Answer the following questions in
questions.md- Considering the pattern above. Why is it beneficial for most functions to only have a single return point in their assembly language? (Only one place that has a
jr ra. Even if the function itself has several points that sayreturn, they typically all result in code that goes to a singlejr rafor the function) - Briefly summarize how the above should ensure that any changes to
spor any of thesregisters being used should not be noticed by any functions that call this function. - Note that the
jalinstruction itself changesra. How should the above be modified for any function that calls another function?
- Considering the pattern above. Why is it beneficial for most functions to only have a single return point in their assembly language? (Only one place that has a
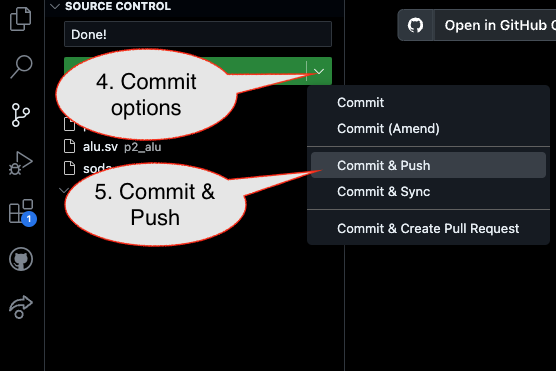
Submission / End-of-class: Commit And Push
1. First, be sure to commit and push files to GitHub (as shown in studio)
1.1
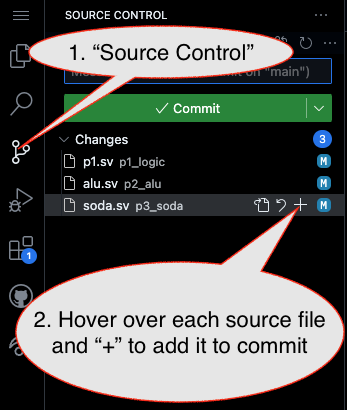
1.2

Caution!
Failure to type in a commit message will cause VSCode to open a window to enter the message (in the editor area) and the Source Control pane will appear to be stuck (a waiting animation) until you type in a message and close the message pane.
1.3
2. Then go to GitHub.com and confirm the updates are on GitHub
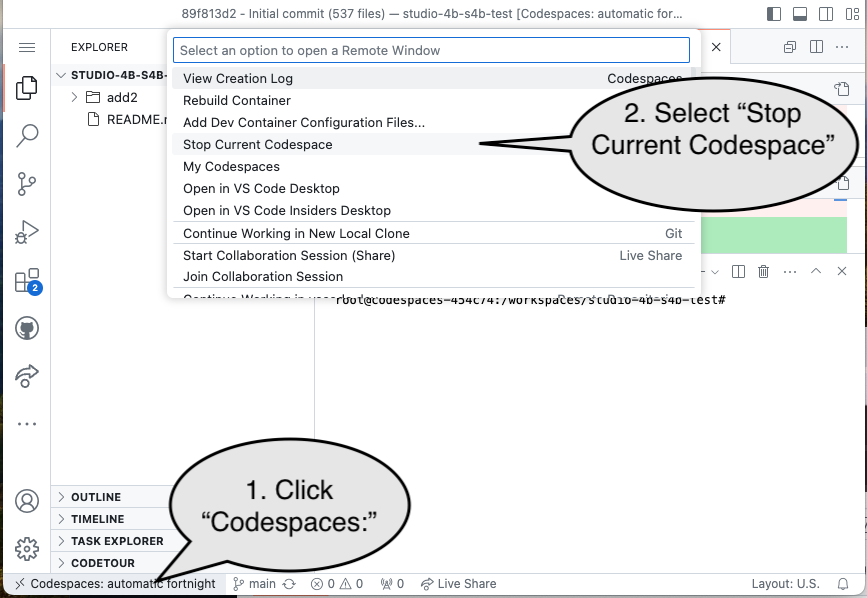
End of Studio: Stop the Codespace
Caution!
Be sure to “stop” your Codespace. You have approximately 60 hours of Codespace time per month. Codespaces often run for ~!5 minutes extra if tabs are just closed.